안녕하세요, 이상민입니다.
이번 프로젝트는 아두이노(esp8266 Node MCU보드)와 firebase의 Realtime Database(RTDB)를 연결하는 프로젝트입니다. 이를 통해 RTDB의 데이터를 아두이노에서 읽어 불을 켜고 끄는 등의 간단한 IOT 기기를 만들 수 있습니다.
※이 글은 23.08.25에 작성되었습니다. 시간이 많이 지난 경우 라이브러리 등이 호환되지 않을 수 있습니다.※
목차는 다음과 같습니다.
1. 아두이노 IDE에서 esp8266 보드 및 firebase 라이브러리 추가
2023.08.25 - [전자공학/아두이노 프로젝트] - [Firebase] 1. 아두이노 IDE에서 esp8266 보드 및 firebase 라이브러리 추가
2. firebase RTDB 설정
- 2023.08.25 - [전자공학/아두이노 프로젝트] - [Firebase] 2. Firebase RTDB 설정
3. 아두이노와 firebase RTDB 연결
- 현재 글
4. firebase RTDB 값을 통해 아두이노 불 켜고 끄기
이번 포스팅에선 3. 아두이노 firebase RTDB 연결에 대해 설명하겠습니다.
아두이노 IDE를 켭니다.
"툴" 탭 -> 보드 -> ESP8266 Boards (3. 1. 2) -> NodeMCU 1.0 (ESP-12E Module) 선택

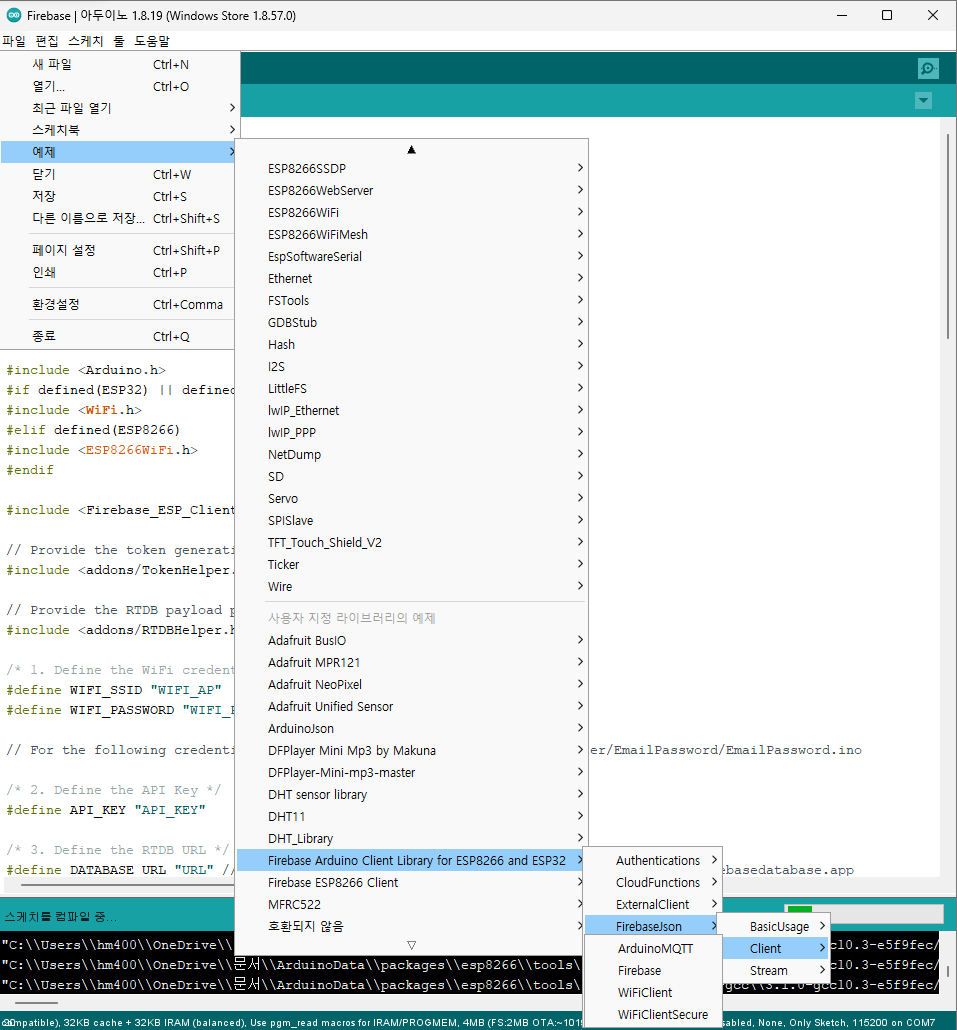
"파일" 탭 -> 예제 -> "Firebase Arduino Client Library for ESP8266 and ESP32 -> Client -> Firebase" 클릭
여기서 아래 4가지 부분을 채워 넣을 것입니다. 작성 시 대소문자, 공백, 특수문자 등 잘 입력 되었는지 확인하세요.

1. 와이파이 관련
WIFI_SSID : ESP8266이 접속할 와이파이 이름
WIFI_PASSWORD : 그 와이파이의 비밀번호, 없다면 ""으로 하면 됨
2. API 키 관련
API_KEY : 아래 설명 따라가기
아래 사이트에 접속
https://firebase.google.com/docs/projects/api-keys?hl=ko#find-api-keys
Firebase용 API 키 사용 및 관리에 대해 알아보기 | Firebase 문서
Google I/O 2022에서 Firebase의 새로운 기능을 확인하세요. 자세히 알아보기 의견 보내기 Firebase용 API 키 사용 및 관리에 대해 알아보기 컬렉션을 사용해 정리하기 내 환경설정을 기준으로 콘텐츠를
firebase.google.com
조금 내리면 다음과 같은 API 키 찾기 -> "API 및 서비스 > 사용자 인증 정보" 버튼 클릭

왼쪽 위 11시방향 프로젝트명이 일치하는지 확인, 일치하지 않다면 버튼을 눌러 프로젝트 찾고 "열기" 버튼
완료 후 API 키 중 "Browser key (auto created by Firebase) 의 오른쪽 표시한 부분 "키 표시" 버튼 누르면 나옴

아래 사진에 표시한 부분을 복사한 후 예제 코드에서 API_KEY에 붙여넣으면 됨.

3. RTDB URL
DATABASE_URL : 데이터베이스 주소로, 아래 사진에서 확인 가능
실시간 데이터베이스 화면 -> "데이터"탭 -> 복사버튼 클릭, 맨 앞에 " https:// "과 맨 뒤에" / " 를 지우고 넣기

4. 유저 이메일 관련
USER_EMAIL : 유저 이메일, 이전 "Firebase RTDB" 설정 글에서 Authentication에서 적은 이메일
USER_PASSWORD : 그때 적은 비밀번호
참고로 실험해 본 결과, 없는 이메일로도 가능하니 실제 이메일 말고 없는 이메일로 하는것을 추천드립니다. 비밀번호도 동일합니다.

아래 코드는 개인정보(와이파이, API key)를 제외한 코드 전문입니다.
/**
 * Created by K. Suwatchai (Mobizt)
 *
 * Email: k_suwatchai@hotmail.com
 *
 * Github: https://github.com/mobizt/FirebaseJson
 *
 * Copyright (c) 2023 mobizt
 *
 */

#include <Arduino.h>
#if defined(ESP32) || defined(ARDUINO_RASPBERRY_PI_PICO_W)
#include <WiFi.h>
#elif defined(ESP8266)
#include <ESP8266WiFi.h>
#endif

#include <Firebase_ESP_Client.h>

// Provide the token generation process info.
#include <addons/TokenHelper.h>

// Provide the RTDB payload printing info and other helper functions.
#include <addons/RTDBHelper.h>

/* 1. Define the WiFi credentials */
#define WIFI_SSID ""
#define WIFI_PASSWORD ""

// For the following credentials, see examples/Authentications/SignInAsUser/EmailPassword/EmailPassword.ino

/* 2. Define the API Key */
#define API_KEY ""

/* 3. Define the RTDB URL */
#define DATABASE_URL "test-blog1-default-rtdb.firebaseio.com" //<databaseName>.firebaseio.com or <databaseName>.<region>.firebasedatabase.app

/* 4. Define the user Email and password that alreadey registerd or added in your project */
#define USER_EMAIL "testblog1@gmail.com"
#define USER_PASSWORD "123123"

// Define Firebase Data object
FirebaseData fbdo;

FirebaseAuth auth;
FirebaseConfig config;

unsigned long sendDataPrevMillis = 0;

unsigned long count = 0;

void setup()
{

    Serial.begin(115200);

    WiFi.begin(WIFI_SSID, WIFI_PASSWORD);
    Serial.print("Connecting to Wi-Fi");
    while (WiFi.status() != WL_CONNECTED)
    {
        Serial.print(".");
        delay(300);
    }
    Serial.println();
    Serial.print("Connected with IP: ");
    Serial.println(WiFi.localIP());
    Serial.println();

    Serial.printf("Firebase Client v%s\n\n", FIREBASE_CLIENT_VERSION);

    /* Assign the api key (required) */
    config.api_key = API_KEY;

    /* Assign the user sign in credentials */
    auth.user.email = USER_EMAIL;
    auth.user.password = USER_PASSWORD;

    /* Assign the RTDB URL (required) */
    config.database_url = DATABASE_URL;

    /* Assign the callback function for the long running token generation task */
    config.token_status_callback = tokenStatusCallback; // see addons/TokenHelper.h

    // Or use legacy authenticate method
    // config.database_url = DATABASE_URL;
    // config.signer.tokens.legacy_token = "<database secret>";

    Firebase.begin(&config, &auth);

    // Comment or pass false value when WiFi reconnection will control by your code or third party library
    Firebase.reconnectWiFi(true);
}

void loop()
{
    // Flash string (PROGMEM and  (FPSTR), String C/C++ string, const char, char array, string literal are supported
    // in all Firebase and FirebaseJson functions, unless F() macro is not supported.

    // Firebase.ready() should be called repeatedly to handle authentication tasks.

    if (Firebase.ready() && (millis() - sendDataPrevMillis > 15000 || sendDataPrevMillis == 0))
    {
        sendDataPrevMillis = millis();

        FirebaseJson json;
        json.setDoubleDigits(3);
        json.add("value", count);

        Serial.printf("Set json... %s\n", Firebase.RTDB.setJSON(&fbdo, "/test/json", &json) ? "ok" : fbdo.errorReason().c_str());

        Serial.printf("Get json... %s\n", Firebase.RTDB.getJSON(&fbdo, "/test/json") ? fbdo.to<FirebaseJson>().raw() : fbdo.errorReason().c_str());

        FirebaseJson jVal;
        Serial.printf("Get json ref... %s\n", Firebase.RTDB.getJSON(&fbdo, "/test/json", &jVal) ? jVal.raw() : fbdo.errorReason().c_str());

        FirebaseJsonArray arr;
        arr.setFloatDigits(2);
        arr.setDoubleDigits(4);
        arr.add("a", "b", "c", true, 45, (float)6.1432, 123.45692789);

        Serial.printf("Set array... %s\n", Firebase.RTDB.setArray(&fbdo, "/test/array", &arr) ? "ok" : fbdo.errorReason().c_str());

        Serial.printf("Get array... %s\n", Firebase.RTDB.getArray(&fbdo, "/test/array") ? fbdo.to<FirebaseJsonArray>().raw() : fbdo.errorReason().c_str());

        Serial.printf("Push json... %s\n", Firebase.RTDB.pushJSON(&fbdo, "/test/push", &json) ? "ok" : fbdo.errorReason().c_str());

        json.set("value", count + 0.29745);
        Serial.printf("Update json... %s\n\n", Firebase.RTDB.updateNode(&fbdo, "/test/push/" + fbdo.pushName(), &json) ? "ok" : fbdo.errorReason().c_str());

        count++;
    }
}
상기 내용 모두 작성 후 ESP8266 보드에 업로드

업로드 완료 후 시리얼 창

업로드 완료 후 RTDB 데이터 탭

Firebase RTDB에 성공적으로 데이터를 업로드한 모습입니다.
이것으로 아두이노에서 Firebase RTDB에 데이터를 업로드가 가능하다는 것을 알았습니다. 그러면 다음 포스팅에서는 데이터를 어떻게 넣고 읽는지 설명 드리겠습니다. 감사합니다.
'전자공학 > 아두이노 프로젝트' 카테고리의 다른 글
| [아두이노 기초] 아두이노 프로그램 코드(스케치) 작성 방법 (0) | 2023.11.22 |
|---|---|
| [아두이노 기초] 아두이노 IDE 설치 방법 및 설명 (0) | 2023.11.21 |
| [Firebase] 4. Firebase RTDB 값을 통해 아두이노 불 켜고 끄기 (0) | 2023.08.29 |
| [Firebase] 2. Firebase Real Time Data Base(RTDB) 설정 (0) | 2023.08.25 |
| [Firebase] 1. 아두이노 IDE에서 esp8266 보드 및 firebase 라이브러리 추가 (0) | 2023.08.25 |


